| Version | Date | Comments |
|---|---|---|
| 0.1 | 17/11/2024 | Initial version |
Terrain Generation
This small program explores terrain generation using Simplex noise. We define a terrain as a 2-dimensional grid with each cell having a depth. To create a continuous surface like an actual terrain we should avoid sudden, discontinous changes between the depth value of adjacent cells. To create a field or terrain like this we use Simplex noise (similar to Perlin noise) as it provides this property, and is also readily available in the love2d engine.
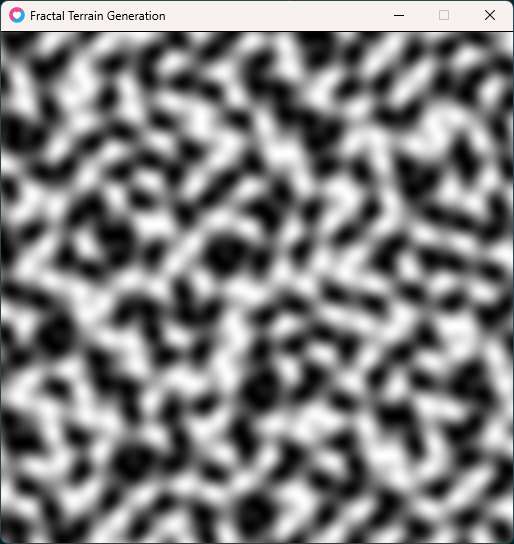
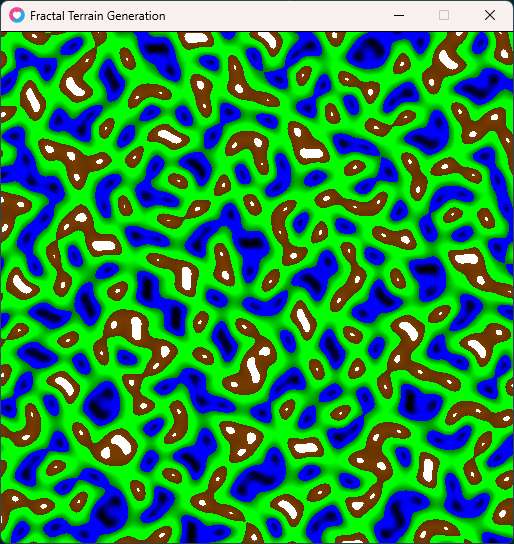
The program provides two different ways to visualize the generated terrain, a grayscale display and a colour-mapped terrain display. The following images provide an example of each.
The Terrain
We start with representation of the terrain as a simple grid. In this section we define a Terrain class which creates the grid and also defines methods to draw the Terrain grid onto the screen either as a grayscale image or as a colour-mapped terrain image.
The creation and display of the Terrain are independent of what algorithm is used to assign the depth values. To keep this program extensible so that I can explore other generation strategies, I've decided to keep only the grid creation and display in the base Terrain class. The grid creation simply assigns a depth of 0 to every cell.
Later in the program we create another class SimplexTerrain which extends this class and provides the implementation for the key method fill which assigns the depth values for each cell.
Imports and Constants
First lets declare the class and also specify some defaults for the grid size.
id: terraindef
local class = require "middleclass"

local Terrain = class("Terrain")

Terrain.static.DEFAULT_WIDTH = 128
Terrain.static.DEFAULT_HEIGHT = 128
Constructor
The constructor is quite simple - it creates a 2-d grid of numbers, initialized to 0.
Note that the display member variable is assigned the value grayscale. This will be discussed in the next section.
id: terrainconstructor
function Terrain:initialize(width, height)
    self.width = width or Terrain.DEFAULT_WIDTH
    self.height = height or Terrain.DEFAULT_HEIGHT
    self.display = "grayscale"

    self.data = {}
    for x = 1, self.width do
        self.data[x] = {}
        for y = 1, self.height do
            self.data[x][y] = 0
        end
    end

    self:fill()

end
Displaying the Terrain
Here we provide two ways of visualizing the grid which can be selected by using the appropriate method call.
- Grayscale: This is selected by calling method
display_grayscale()on theTerraininstance. It will display the terrain as a field of grayscale values ranging from 0 to the maximum depth of the terrain. - Colour-mapped Terrain: This is selected by calling the method
display_colour_mapped(). It will display the terrain in four colours for water, grassland, mountain and snow in increasing order of depth value. The thresholds for these colours are chosen arbitrarily.
The draw method simply chooses between draw_grayscale or draw_colour_mapped based on the chosen display. As we saw in the constructor the default display is grayscale.
The implementations of the two display mechanisms are rather straightforward and self-explanatory. We find the maximum depth of the field, and then map the values to the appropriate range. In the case of grayscale this range is [0, 1]. Whereas in the case of colour-mapped terrain the ranges are some arbitrary values I have picked.
id: terraindisplay
function Terrain:display_grayscale()
    self.display = "grayscale"
end

function Terrain:display_colour_mapped()
    self.display = "colour_mapped"
end

function Terrain:draw()
    if self.display == "grayscale" then
        self:draw_grayscale()
    end

    if self.display == "colour_mapped" then
        self:draw_colour_mapped()
    end
end

function Terrain:draw_grayscale()
    -- get the max height value
    local max = 0
    for x = 1, self.width do
        for y = 1, self.height do
            if self.data[x][y] > max then
                max = self.data[x][y]
            end
        end
    end

    -- draw terrain as grayscale height map directly to screen
    for x = 1, self.width do
        for y = 1, self.height do
            -- colour normalized to range 0-1
            local color = self.data[x][y] / max
            love.graphics.setColor(color, color, color)
            love.graphics.points(x, y)
        end
    end
end

function Terrain:get_colour_of_height(value)
    if value < 0.25 then
        return {0, 0, value * 10} -- Blue for water
    elseif value < 0.75 then
        return {0, value * 2, 0} -- Green for plains
    elseif value < 0.95 then
        return {0.5 * value, 0.25 * value, 0} -- Brown for mountains
    else
        return {1, 1, 1} -- White for snow
    end
end

function Terrain:draw_colour_mapped()
    -- get the max height value
    local max = 0
    for x = 1, self.width do
        for y = 1, self.height do
            if self.data[x][y] > max then
                max = self.data[x][y]
            end
        end
    end

    -- draw terrain as grayscale height map directly to screen
    for x = 1, self.width do
        for y = 1, self.height do
            -- colour normalized to range 0-1
            local color = self:get_colour_of_height(self.data[x][y] / max)
            love.graphics.setColor(color[1], color[2], color[3])
            love.graphics.points(x, y)
        end
    end
end
Terrain Class
We bring together all the elements of the class in the terrain.lua file. Notice that we define an empty method fill() which must be extended by a class which implements a particular strategy for creating the depth field.
file: terrain.lua
@<terraindef@>

@<terrainconstructor@>

@<terraindisplay@>

function Terrain:fill()
end

return Terrain
Simplex Noise Terrain
The SimplexTerrain class defines just one method. This method is the key to the entire program. It uses the Simplex Noise API available in love2d, using the function love.math.noise. We generate the noise in 2-d space with inputs which are a function of x, and y, the cell coordinates, and some randomness to ensure we can create a new terrain every time we call fill().
file: simplex_terrain.lua
local Terrain = require "terrain"
local class = require "middleclass"

local SimplexTerrain = class("SimplexTerrain", Terrain)

function SimplexTerrain:initialize(width, height)
    Terrain.initialize(self, width, height)
end

function SimplexTerrain:fill()
    local baseX = 100 * love.math.random()
    local baseY = 100 * love.math.random()

    for x = 1, self.width do
        for y = 1, self.height do
            local nx = 0.02
            local ny = 0.02
            local value = love.math.noise(baseX + nx * x, baseY + ny * y)
            self.data[x][y] = value
        end
    end
end

return SimplexTerrain
main.lua
The main program is quite simple.
- We import the SimplexTerrain class, and create an instance during
load(). - We draw the state of the terrain in the
draw()method by callingt:draw(), wheretis the instance of the terrain. - The keypressed method defines shortcuts:
- spacebar: to generate a new terrain.
- g: switches to grayscale display.
- c: switches to colour-mapped display.
- esc: quits the program.
Module Imports & Variables
id: moduleglobal
-- All imports and module scope variables go here.

local Terrain = require "terrain"
local SimplexTerrain = require "simplex_terrain"

local t
love.load - Initialization
id: loveload
--- love.load: Called once at the start of the simulation
function love.load()
    t = SimplexTerrain(512, 512)
end
love.update - Update the Simulation
id: loveupdate
--- love.update: Called every frame, updates the simulation
function love.update(dt)
end
love.draw - Draw the Simulation
id: lovedraw
--- love.draw: Called every frame, draws the simulation
function love.draw()
    t:draw()
end
love.keypressed - Handle Keyboard Events
id: lovekeypressed
-- escape to exit
function love.keypressed(key)
    if key == "escape" then
        love.event.quit()
    end
    -- on spacebar press, generate new terrain
    if key == "space" then
        t:fill()
    end
    -- on 'g' set display to grayscale
    if key == "g" then
        t:display_grayscale()
    end
    -- on 'c' set display to grayscale
    if key == "c" then
        t:display_colour_mapped()
    end
end
file: main.lua
--- main.lua: <Empty> Simulation in LÖVE
-- date: 4/3/2024
-- author: Abhishek Mishra

@<moduleglobal@>

@<loveload@>

@<loveupdate@>

@<lovedraw@>

@<lovekeypressed@>
conf.lua
file: conf.lua
--- conf.lua: Config for the love2d game.
-- canvas size
local canvasWidth = 512
local canvasHeight = 512

function love.conf(t)
    -- set the window title
    t.window.title = "Fractal Terrain Generation"

    -- set the window size
    t.window.width = canvasWidth
    t.window.height = canvasHeight

    -- disable unused modules for performance
    t.modules.joystick = false
    t.modules.physics = false
    t.modules.touch = false

    -- enable console
    -- TODO: turning on console crashes Love2D on Windows,
    -- so it's disabled for now
    -- t.console = true
end
Building and Running the Program
See the Makefile in the current directory to see how to build and run the program.